How To Install FusionPBX 4.4 On Debian 9 | FusionPBX Old Version Installation15 min read
In this tutorial, how to install FusionPBX 4.4 on Debian 9. I face latest version of FusionPBX some issue, so I try to find out old version is ok. You can use this version for your production purposes.
################################
OS Type 	: Debian 9:13
RAM 		: 2.5 GB
DISK 		: 25 GB
IP Address 	: 10.66.100.15
vCPU 		: 2
Service 	: FusionPBX 4.4
FreeSwitch	: 1.8
postgresql	: 11
PHP		: 7.1
################################
Step #01: Check server ip and server upgrade.
root@pbx:~# lsb_release -a && ip r
root@pbx:~# apt update && apt upgrade -y && apt -y remove apache2
root@pbx:~# apt -y install git nano dbus sudo nginx curl lsb-release sqlite3 haveged ghostscript libtiff5-dev libtiff-tools at tftpd ssl-cert fail2ban
Install postgresql 11 version using below command.
root@pbx:~# echo "deb http://apt.postgresql.org/pub/repos/apt/ $(lsb_release -sc)-pgdg main" > /etc/apt/sources.list.d/postgresql.list
root@pbx:~# wget --quiet -O - https://www.postgresql.org/media/keys/ACCC4CF8.asc | sudo apt-key add -
root@pbx:~# apt update && apt install -y postgresql-11 postgresql-client-11
If have your server install old version php, so must be remove using below command.
root@pbx:~# apt remove -y php5* php7.0*
Step #02: Install php7.1 on your Debian 9 pbx server.
root@pbx:~# apt -y install apt-transport-https ca-certificates
root@pbx:~# wget -O /etc/apt/trusted.gpg.d/php.gpg https://packages.sury.org/php/apt.gpg
root@pbx:~# echo "deb https://packages.sury.org/php/ $(lsb_release -sc) main" > /etc/apt/sources.list.d/php.list
root@pbx:~# apt update && apt -y install php7.1 php7.1-cli php7.1-common php7.1-curl php7.1-mcrypt php7.1-pgsql php7.1-sqlite3 php7.1-odbc php7.1-xml php7.1-imap php7.1-fpm
Install sngrep for pbx traffic monitor.
root@pbx:~# wget http://packages.irontec.com/public.key -q -O - | apt-key add -
root@pbx:~# echo "deb http://packages.irontec.com/debian $(lsb_release -sc) main" > /etc/apt/sources.list.d/irontec.list
root@pbx:~# apt update && apt -y install sngrep
Must be disable any firewall or iptables using below command.
root@pbx:~# systemctl disable firewalld
root@pbx:~# systemctl disable iptables
root@pbx:~# systemctl stop firewalld
root@pbx:~# systemctl stop iptables
Setup time zone as your location.
root@pbx:~# tzselect
My time zone is Asia/Dhaka
Step #03: Install FreeSwitch 1.8 version on Debian 9.
root@pbx:~# systemctl restart rsyslog
root@pbx:~# wget -O - https://files.freeswitch.org/repo/deb/freeswitch-1.8/fsstretch-archive-keyring.asc | apt-key add -
root@pbx:~# echo "deb http://files.freeswitch.org/repo/deb/freeswitch-1.8/ $(lsb_release -sc) main" > /etc/apt/sources.list.d/	freeswitch.list
root@pbx:~# apt update && apt -y install freeswitch-all freeswitch-all-dbg freeswitch-sounds* freeswitch-music* gdb
Edit postgresql file for trust. Open below file and replace md5 on trust.
root@pbx:~# nano +92 /etc/postgresql/11/main/pg_hba.conf
Then save press Ctrl+x then press y then press Enter.
Restart postgresql service using below command.
root@pbx:~# systemctl restart postgresql
root@pbx:~# sudo -u postgres psql -l
root@pbx:~# sudo -u postgres psql
root@pbx:~# exit
Step #04: Setup postgresql database user name and password.
root@pbx:~# cd /tmp
root@pbx:/tmp# password=P@ssw0rd0@123
root@pbx:/tmp# sudo -u postgres psql -c "SET client_encoding = 'UTF8';"
root@pbx:/tmp# sudo -u postgres psql -c "CREATE DATABASE fusionpbx_db;"
root@pbx:/tmp# sudo -u postgres psql -c "CREATE DATABASE freeswitch_db;"
root@pbx:/tmp# sudo -u postgres psql -c "CREATE ROLE fusionpbx_user WITH SUPERUSER LOGIN PASSWORD '$password';"
root@pbx:/tmp# sudo -u postgres psql -c "GRANT ALL PRIVILEGES ON DATABASE fusionpbx_db to fusionpbx_user;"
root@pbx:/tmp# sudo -u postgres psql -c "GRANT ALL PRIVILEGES ON DATABASE freeswitch_db to fusionpbx_user;"
root@pbx:/tmp# cd
Download FusionPBX 4.4 github file using below link.
root@pbx:~# mkdir -p /etc/fusionpbx
root@pbx:~# mkdir -p /var/www/fusionpbx
root@pbx:~# mkdir -p /var/cache/fusionpbx
root@pbx:~# git clone -b 4.4 https://github.com/powerpbx/fusionpbx.git /var/www/fusionpbx
Now configure FreeSwitch for FusionPBX.
root@pbx:~# mv /etc/freeswitch /etc/freeswitch.orig
root@pbx:~# mkdir /etc/freeswitch
root@pbx:~# cp -R /var/www/fusionpbx/resources/templates/conf/* /etc/freeswitch
root@pbx:~# mkdir -p /usr/share/freeswitch/sounds/music/default
root@pbx:~# mv /usr/share/freeswitch/sounds/music/*000/ /usr/share/freeswitch/sounds/music/default/
Increase php upload file size, execution time.
root@pbx:~# sed 's#post_max_size = .*#post_max_size = 80M#g' -i /etc/php/7.1/fpm/php.ini
root@pbx:~# sed 's#upload_max_filesize = .*#upload_max_filesize = 80M#g' -i /etc/php/7.1/fpm/php.ini
root@pbx:~# sed 's#max_execution_time = .*#max_execution_time = 120#g' -i /etc/php/7.1/fpm/php.ini
root@pbx:~# systemctl restart php7.1-fpm
Step #05: Nginx web server configure for FusionPBX.
root@pbx:~# mkdir -p /etc/nginx/ssl
root@pbx:~# cd /etc/nginx/sites-available
root@pbx:~# wget https://raw.githubusercontent.com/powerpbx/fusionpbx-install.sh/master/debian/resources/nginx/fusionpbx
root@pbx:~# nano /etc/nginx/sites-available/fusionpbx
add your server ip address or domain name on fusionpbx web config file for three times.
fpm socket file add on fusionpbx nginx web config file.
root@pbx:~# sed -i /etc/nginx/sites-available/fusionpbx -e 's#unix:.*;#unix:/var/run/php/php7.1-fpm.sock;#g'
root@pbx:~# ln -s /etc/nginx/sites-available/fusionpbx /etc/nginx/sites-enabled/fusionpbx
root@pbx:~# rm /etc/nginx/sites-enabled/default
root@pbx:~# ln -s /etc/ssl/private/ssl-cert-snakeoil.key /etc/ssl/private/nginx.key
root@pbx:~# ln -s /etc/ssl/certs/ssl-cert-snakeoil.pem /etc/ssl/certs/nginx.crt
root@pbx:~# systemctl restart nginx
root@pbx:~# systemctl stop freeswitch
root@pbx:~# rm -r /run/freeswitch
Create FreeSwitch service, open below file.
root@pbx:~# nano /etc/systemd/system/freeswitch.service
Then insert below all lines into this file.
[Unit]
Description=freeswitch
After=syslog.target network.target local-fs.target postgresql.service

[Service]
Type=forking
RuntimeDirectory=freeswitch
PIDFile=/run/freeswitch/freeswitch.pid
Environment="DAEMON_OPTS=-ncwait -nonat"
EnvironmentFile=-/etc/default/freeswitch
ExecStart=/usr/bin/freeswitch $DAEMON_OPTS
TimeoutSec=45s
Restart=always

User=www-data
Group=www-data

LimitCORE=infinity
LimitNOFILE=100000
LimitNPROC=60000
LimitSTACK=250000
LimitRTPRIO=infinity
LimitRTTIME=infinity
IOSchedulingClass=realtime
IOSchedulingPriority=2
CPUSchedulingPriority=89
UMask=0007

; Comment this out if using OpenVZ
CPUSchedulingPolicy=rr

[Install]
WantedBy=multi-user.target
Create environment file.
cat >> /etc/default/freeswitch << EOF
# Uncommented variables will override variables in unit file
# User=""
# Group=""
# DAEMON_OPTS=""
EOF
Step #06: Setup ownership and permission on FusionPBX.
root@pbx:~# mkdir -p /var/run/freeswitch
root@pbx:~# chown -R www-data. /etc/freeswitch /etc/fusionpbx /var/cache/fusionpbx /var/lib/freeswitch /var/log/freeswitch /usr/share/freeswitch /var/www/fusionpbx /var/run/freeswitch
Setup directory and file permission.
root@pbx:~# find /etc/freeswitch -type d -exec chmod 755 {} \;
root@pbx:~# find /etc/fusionpbx -type d -exec chmod 755 {} \;
root@pbx:~# find /var/cache/fusionpbx -type d -exec chmod 755 {} \;
root@pbx:~# find /var/lib/freeswitch -type d -exec chmod 755 {} \;
root@pbx:~# find /var/log/freeswitch -type d -exec chmod 755 {} \;
root@pbx:~# find /usr/share/freeswitch -type d -exec chmod 755 {} \;
root@pbx:~# find /var/www -type d -exec chmod 755 {} \;
root@pbx:~# find /etc/freeswitch -type f -exec chmod 664 {} \;
root@pbx:~# find /etc/fusionpbx -type f -exec chmod 664 {} \;
root@pbx:~# find /var/lib/freeswitch -type f -exec chmod 664 {} \;
root@pbx:~# find /var/log/freeswitch -type f -exec chmod 664 {} \;
root@pbx:~# find /usr/share/freeswitch -type f -exec chmod 664 {} \;
root@pbx:~# find /var/www -type f -exec chmod 664 {} \;
root@pbx:~# chmod -R 755 /var/www/fusionpbx/secure
root@pbx:~# systemctl daemon-reload
root@pbx:~# systemctl enable freeswitch
Open FreeSwitch auto_load config file.
root@pbx:~# nano +147 /etc/freeswitch/autoload_configs/switch.conf.xml
Insert below line into switch.conf.xml file.
<param name="core-db-dsn" value="pgsql://hostaddr=127.0.0.1 dbname=freeswitch user=fusionpbx password='P@ssw0rd0@123'" />
Then save press Ctrl+x then press y then press Enter.
Now reboot your server and check freeswitch status is ok or not. If not ok, so find out what log file what is error.
root@pbx:~# reboot
root@pbx:~# systemctl status freeswitch.service
Step #06: Now browse server ip address and complete web installation process.
https://10.66.100.15/

Select your own language and then press Next on the right side.
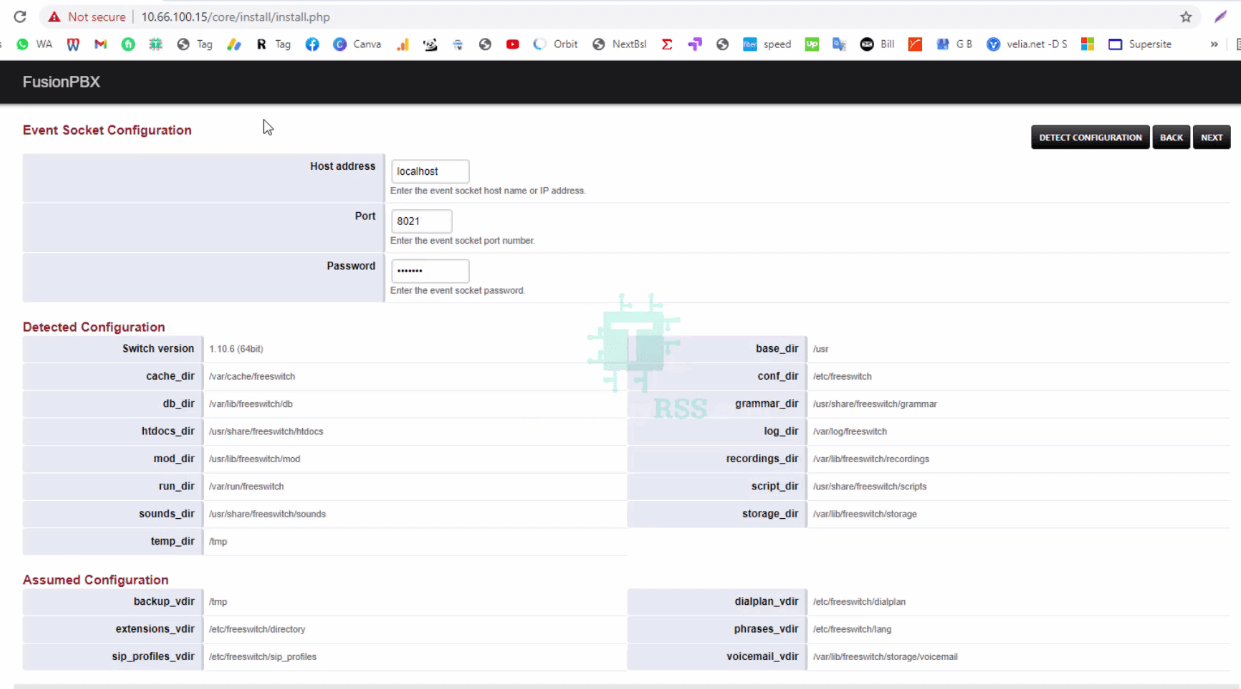
Then go to Event Socket Configuration page. It will automatically setup host address, port and password. Then click Next on the right side.
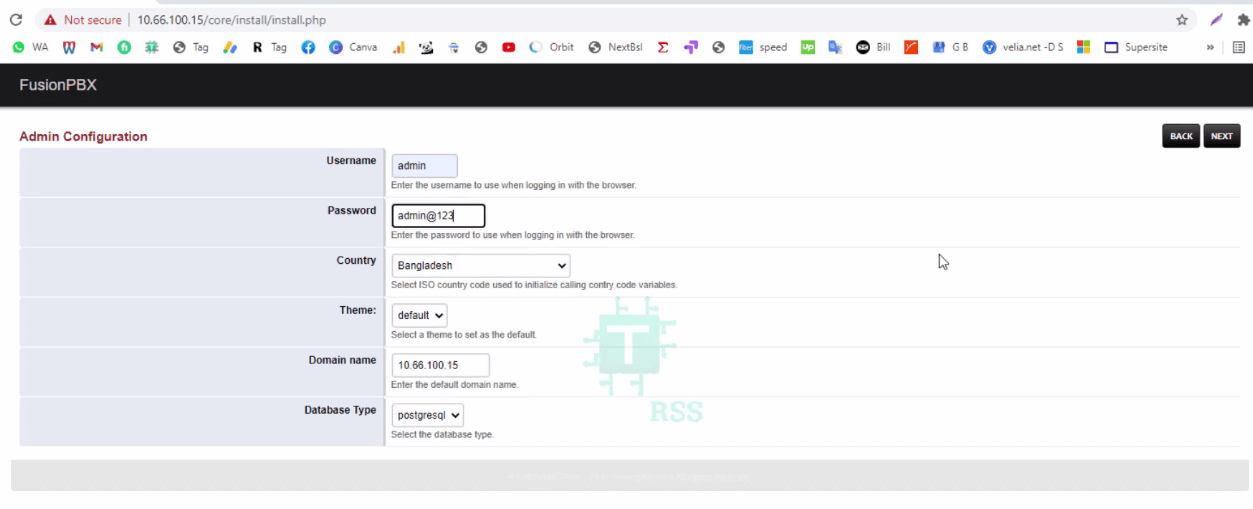
Come up Admin configuration page. Type your admin user name, password, country and other is default. Then click Next on the right side.
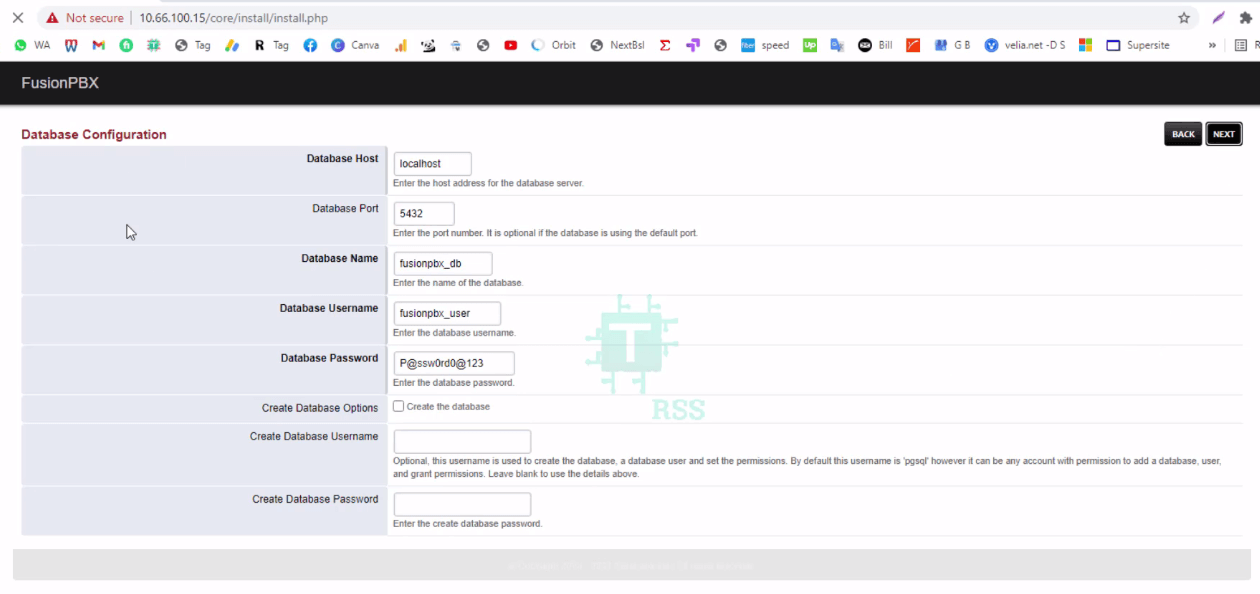
Input database name, database user and database user password or you can create new user and password. Then click Next on the right side. When done Successfully installation then come up login page.

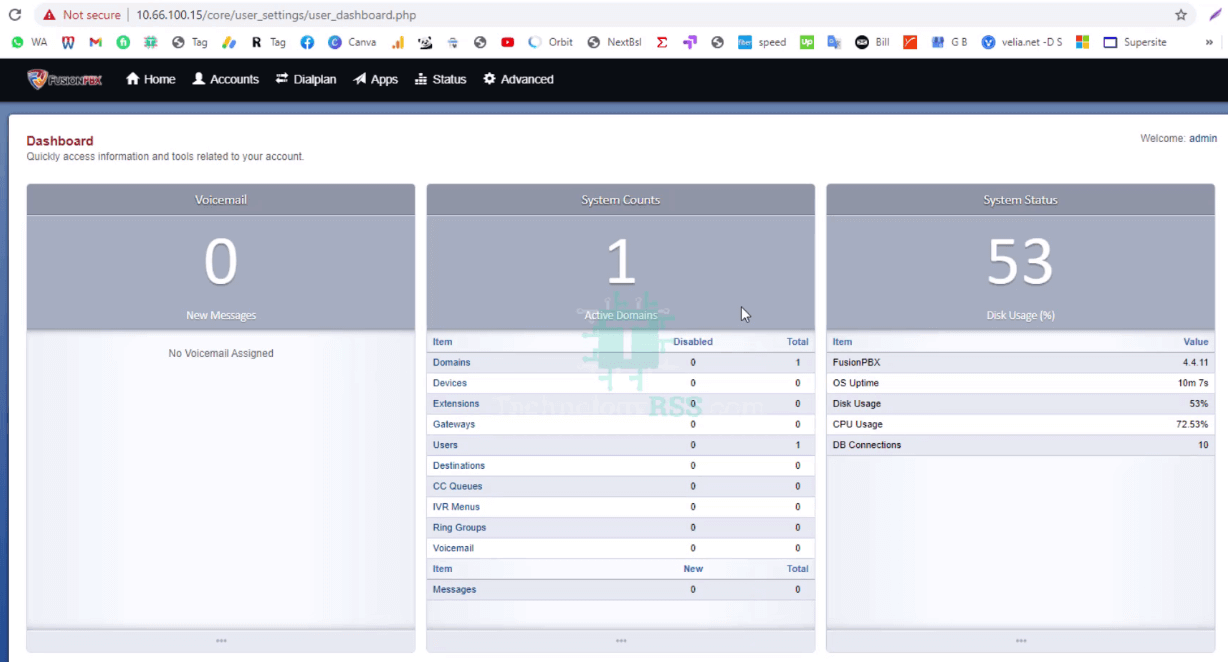
Now login using previously created admin account and password. Now see FusionPBX dashboard 4.4.11 version as like below.
If you face any error so please see my YouTube channel for more details.

Thanks to all.
- How To Clear RAM Memory Cache Buffer Linux Server - February 29, 2024
- How To Install Apache Cloud Stack Management Server 4.17 On Ubuntu 22.04 - February 1, 2024
- How To Install Zabbix Server 6.4 On Ubuntu 22.04 - October 24, 2023

We really appreciate for your support for buying me a coffee.
It takes us a while to compose and upload new content, as they have to be checked to see if Properly works. We appreciate you if you help me for one cup of coffee to keep us awake and always deliver good quality content.
No contribution is small of an amount. We are grateful for any amount you support us with. Thank you!