How To Install FreePBX Server On Ubuntu 14.0410 min read
Deploy asterisk FreePBX server on ubuntu 14.04. FreePBX is an open source ip telephony system provided by sangoma. Create virtual machine with some configuration such as memory 2GB, RAM 2GB and harddisk 20GB.
Then install ubuntu 14.04 on your virtual machine. First install FreePBX 12 then upgrade to FreePBX 13
★ How To Setup CHAN SIP Trunk
★ How To Monitor Linux Server From Zabbix Server
Step #01: FreePBX system update and upgrade needed.
root@FreePBX:~# apt-get update && apt-get upgrade
Step #02: Now install some required packages like as php. mysql and git.
apt-get install -y build-essential linux-headers-`uname -r` openssh-server apache2 mysql-server mysql-client bison flex php5 php5-curl php5-cli php5-mysql php-pear php-db php5-gd curl sox libncurses5-dev libssl-dev libmysqlclient-dev mpg123 libxml2-dev libnewt-dev sqlite3 libsqlite3-dev pkg-config automake libtool autoconf git subversion unixodbc-dev uuid uuid-dev libasound2-dev libogg-dev libvorbis-dev libcurl4-openssl-dev libical-dev libneon27-dev libsrtp0-dev libspandsp-dev libmyodbc
During installation, you need to set a password for the MySQL. In my case I set a password “passw0rd”
Now create asterisk user and asterisk database with all grant privileges.
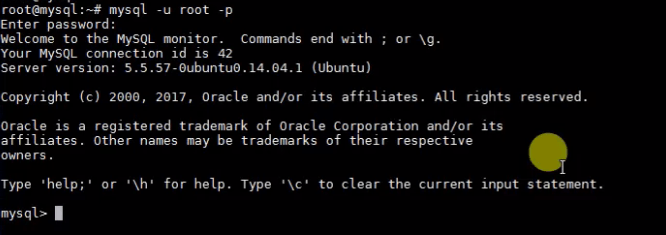
root@FreePBX:~# mysql -uroot -ppassw0rd
show as like below
Step #03: Create asterisk database.
mysql > create database asterisk;
mysql > grant all privileges on asterisk.* to asterisk@localhost identified by 'passw0rd';
mysql > create database asteriskcdrdb;
mysql > grant all privileges on asteriskcdrdb.* to asterisk@localhost identified by 'passw0rd';
mysql > flush privileges;
mysql > exit;
Peer uninstall DB
root@FreePBX-:~# pear uninstall db
Peer Install DB
root@FreePBX:~# pear install db-1.7.14
Step #04: Goto cd /usr/src and download FreePBX required packages.
root@FreePBX:/usr/src# wget -c https://src.fedoraproject.org/lookaside/pkgs/iksemel/iksemel-1.4.tar.gz/md5/532e77181694f87ad5eb59435d11c1ca/iksemel-1.4.tar.gz
Now extract and step by step follow command
root@FreePBX:/usr/src# tar xf iksemel-1.4.tar.gz
root@FreePBX:/usr/src# cd iksemel-1.4/
root@FreePBX:/usr/src/iksemel-1.4# ./configure
root@FreePBX:/usr/src/iksemel-1.4# make
root@FreePBX:/usr/src/iksemel-1.4# make install
Step #05: Goto cd ../ for previous directory.
root@FreePBX:/usr/src/iksemel-1.4# cd ../
root@FreePBX:/usr/src# wget -c http://downloads.asterisk.org/pub/telephony/asterisk/old-releases/asterisk-12.8.2.tar.gz
root@FreePBX:/usr/src# git clone https://github.com/akheron/jansson.git
root@FreePBX:/usr/src# git clone https://github.com/asterisk/pjproject.git
Goto pjproject folder and run below command step by step
root@FreePBX:/usr/src# cd pjproject
root@FreePBX:/usr/src/pjproject# ./configure --enable-shared --disable-sound --disable-resample --disable-video --disable-opencore-amr
root@FreePBX:/usr/src/pjproject# make dep
root@FreePBX:/usr/src/pjproject# make
root@FreePBX:/usr/src/pjproject# make install
Step #06: Goto cd ../ for previous directory then run one by one command
root@FreePBX:/usr/src/pjproject# cd ../jansson
root@FreePBX:/usr/src/jansson/# autoreconf -i
root@FreePBX:/usr/src/jansson/# ./configure
root@FreePBX:/usr/src/jansson/# make
root@FreePBX:/usr/src/jansson/# make install
Step #07: Goto cd ../ for previous directory.
root@FreePBX:/usr/src/pjproject# cd ../
root@FreePBX:/usr/src# tar xf asterisk-12.8.2.tar.gz
root@FreePBX:/usr/src/jansson/# cd asterisk-12.8.2/
root@FreePBX:/usr/src/asterisk-12.8.2# ./configure
root@FreePBX:/usr/src/asterisk-12.8.2# contrib/scripts/get_mp3_source.sh
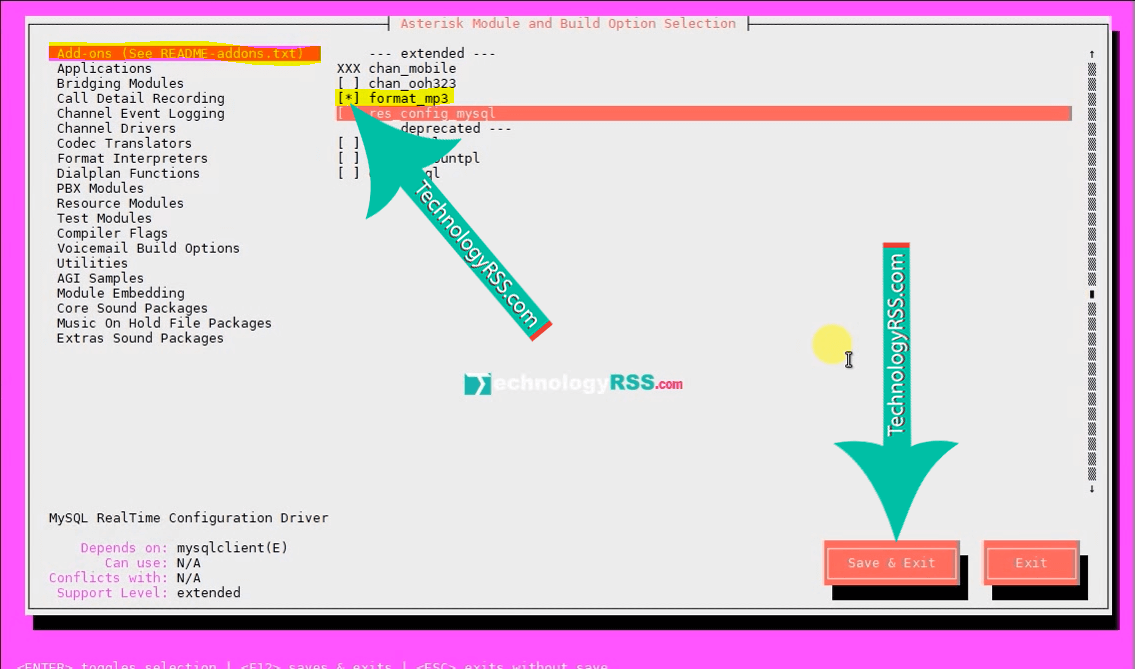
root@FreePBX:/usr/src/asterisk-12.8.2# make menuselect
Select format mp3 on the right tab see image below
root@FreePBX:/usr/src/asterisk-12.8.2# make
root@FreePBX:/usr/src/asterisk-12.8.2# make install
root@FreePBX:/usr/src/asterisk-12.8.2# ldconfig
Step #08: Download sound package.
root@FreePBX:/usr/src/asterisk-12.8.2# cd /var/lib/asterisk/sounds/
Then extract and remove downloaded file
root@FreePBX:/var/lib/asterisk/sounds# wget http://downloads.asterisk.org/pub/telephony/sounds/asterisk-extra-sounds-en-wav-current.tar.gz
root@FreePBX:/var/lib/asterisk/sounds# tar xf asterisk-extra-sounds-en-wav-current.tar.gz
root@FreePBX:/var/lib/asterisk/sounds# rm -rf asterisk-extra-sounds-en-wav-current.tar.gz
Step #09: Download FreePBX web gui and added some permission.
root@FreePBX:/var/lib/asterisk/sounds# cd /mnt
root@FreePBX:/mnt# wget http://mirror.freepbx.org/modules/packages/freepbx/freepbx-12.0-latest.tgz
root@FreePBX:/mnt# tar xf freepbx-12.0-latest.tgz
root@FreePBX:/mnt# useradd -m asterisk
root@FreePBX:/mnt# chown asterisk. /var/run/asterisk
root@FreePBX:/mnt# chown -R asterisk. /etc/asterisk
root@FreePBX:/mnt# chown -R asterisk. /var/{lib,log,spool}/asterisk
root@FreePBX:/mnt# chown -R asterisk. /usr/lib/asterisk
root@FreePBX:/mnt# chown asterisk /var/lib/php5/
root@FreePBX:/mnt# chown asterisk.asterisk /var/lib/php5/
root@FreePBX:/mnt# rm -rf /var/www/html
Step #10: Increase upload maximum size and add asterisk use and group.
upload_max_filesize=120M and add User asterisk, Group asterisk
root@FreePBX:# vi /etc/apache2/apache2.conf
Goto line number 109 and 110 insert below lines
User asterisk
Group asterisk
See my video for upload file size, add user and group
Step #11: Goto mysql terminal and import FreePBX asterisk and asteriskcdrdb databases.
When database import then ask mysql database password and type here.
root@FreePBX:/mnt# cd freepbx/SQL/
root@FreePBX:/mnt/freepbx/SQL# mysql -u root -p asterisk < newinstall.sql
root@FreePBX:/mnt/freepbx/SQL# mysql -u root -p asteriskcdrdb < cdr_mysql_table.sql
Step #12: Now install FreePBX web gui.
root@FreePBX:/mnt/freepbx/SQL# cd ../
root@FreePBX:/mnt/freepbx# ./start_asterisk start
root@FreePBX:/mnt/freepbx$ ./install_amp
Then important asterisk user, asterisk DB password and IP address then proceed.
Database engine [mysql]: Enter
Database name [asterisk]: Enter
CDR Database name [asteriskcdrdb]: Enter
Database username [root]: Enter
Database password: type your password here
File owner user [asterisk]: Enter
File owner group [asterisk]: Enter
Filesystem location from which FreePBX files will be sarved [/var/www/html: Enter
At this time please restart asterisk.
Now your server reboot and start asterisk
root@FreePBX:/mnt/freepbx/SQL# reboot
Now got your browser and type your FreePBX server ip address then create admin user for login web GUI.
http://10.66.51.10/admin/
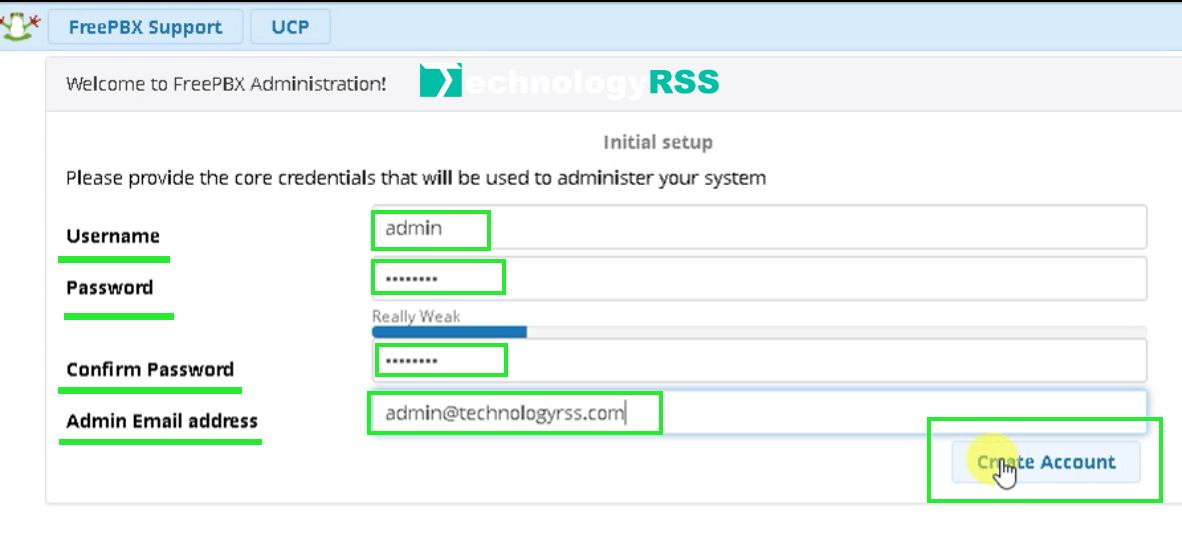
Prepare login credential using created user name and password.
Troubleshooting
Client denied by server configuration: /var/www/html/admin/
If face any problem then see my YouTube video and Subscribe my channel. Please subscribe my channel for more update.
- How To Install Zabbix Server 6.4 On AlmaLinux 8 Server - August 9, 2024
- How To Clear RAM Memory Cache Buffer Linux Server - February 29, 2024
- How To Install Apache Cloud Stack Management Server 4.17 On Ubuntu 22.04 - February 1, 2024
We really appreciate for your support for buying me a coffee.
It takes us a while to compose and upload new content, as they have to be checked to see if Properly works. We appreciate you if you help me for one cup of coffee to keep us awake and always deliver good quality content.
No contribution is small of an amount. We are grateful for any amount you support us with. Thank you!


